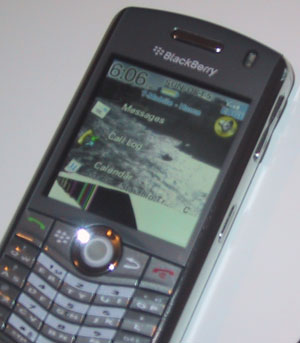
 Last night as I was walking home I pulled my BlackBerry Pearl 8120 out of my back pocket and noticed that the LCD was cracked (image here). I have no idea how this happened — I didn’t drop it or anything. The phone is only two weeks old! Unfortunately, no matter how it happened I knew T-Mobile wasn’t going to have much sympathy for my plight. T-Mobile, like most carriers, considers any screen breakage to be the customer’s fault, and it’s not covered by warranty.
This particular Pearl, however, was a replacement for my old Pearl — an earlier model 8100 — which I accidentally dropped in the toilet about two weeks ago. And that gave me an idea: Why not swap out the broken screen in the new Pearl with the working screen from the old one?
This was, of course, a crazy idea. Mobile phones are modern marvels of micro-scale engineering. They’re just not meant to be serviced by the public. If you even try to open one up, you’ll probably end up breaking something important and you’ll be out a couple hundred bucks. A plan that calls for taking two of them apart is doubly crazy.
So I charged on ahead.
The first thing I did was scour the Web for advice. Sure enough, I found a very informative video showing how to take apart your BlackBerry Pearl. Next, I hopped down to my local hardware store and bought a Torx T-6 screwdriver, which is apparently the size you need to open all kinds of mobile phones.
I’ll spare you the blow-by-blow of the process of disassembling the phone, because the video explains it nicely. I can tell you what it was like to actually do it, however: nerve-wracking. I reiterate my statements from three paragraphs ago: You’d be crazy to try to do this. I don’t recommend it. In fact, I recommend against it. (And bear in mind that it voids your warranty — but we’ve already established that your warranty is pretty useless if your LCD is already broken.)
Note, however, that if you don’t happen to have a spare Pearl lying around, you could perform the same operation with a replacement screen that you order online. They cost about $40.
Some observations:
First, taking off the bottom piece of plastic is the hardest part. It’s not immediately clear how to do it, and once you start messing around with it you realize quickly that it seems pretty easy to break. In the video they use a small screwdriver to pry off the tabs. I’d try to avoid this. In the battle between metal and plastic, plastic inevitably loses. In the end I felt the most confident just prying it off with my thumbnails. The tabs that hold it on aren’t really locked into anything. You just want to use the natural pliability of the plastic to pop it off — carefully.
You should use caution when removing the side plastic pieces, also. Go gently. I found that when you get to a certain point they will suddenly fly off in a way that’s a little startling, but if you’ve done it right they won’t have broken.
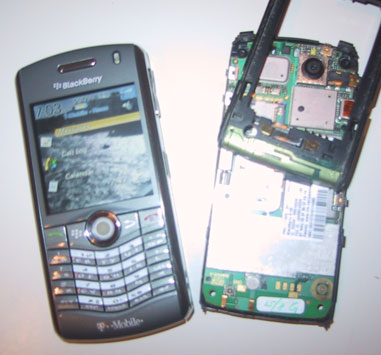
Now you get to the nerve-wracking part, when you realize that you’ve just taken apart your phone and you’re about to fiddle around with the screen and the tiny motherboard. Don’t get spooked — there’s no point in turning back now.
In the video they point out a small piece of tape over the ribbon connector for the screen that needs to be removed. It was there on my 8120, but oddly enough the 8100 had no piece of tape. Because of this, I didn’t really worry about saving the tape from the 8120. If it wasn’t installed in one of the phones then it must not really be necessary.
Try not to touch the LCD. Pretend that touching it will make it shrivel up and die. But in reality you will get a few fingerprints on it. For that reason, you’ll want some kind of lint-free cloth available to wipe it clean before you put the phone back together. I used a chamois that came with my Asus Eee PC 901.
Removing the screen is the most nerve-wracking part of all. It’s actually stuck to the motherboard with a big piece of double-sided tape. You need to loosen that tape slowly, very gently, so as not to damage anything. For what it’s worth, the tape seemed a lot stronger on the 8100 than the 8120 — perhaps the adhesive gets tougher with age.
Here’s where your little flat-head screwdriver comes in handy. Get it underneath one of the corners of the LCD and pry ever so gently. Work your way around the screen, doing your best to touch as little of the motherboard as possible. Don’t dig deep underneath; just work around the sides. If you’re doing it right, you should hear a sound almost exactly like transparent tape coming off the roll.
Once you’ve got the screen off, if you’ve remembered to flip open the little latch on the ribbon connector, it should slide right out. You shouldn’t have to touch the ribbon cable at all.
If you’re planning to re-use a screen that you’ve removed from a phone, remember to lay it glass side down, because the adhesive will stick it to your workbench. Try to get a minimum of lint and crumbs onto the tape, also.
Replacing the LCD isn’t difficult. The ribbon cable should slide right in with no pressure required. Remember to close the little black latch to lock it in place. Hold the LCD by the sides and give it a little squeeze against the motherboard so that the adhesive sticks. It’s at this point, also, that you’ll want to clean any fingerprints off the LCD.
The case reassembles in exactly the opposite order of steps that you just took to disassemble it (naturally). The side pieces seemed a little fussy; squeeze them as you re-insert the Torx screws to make sure everything is in place. Everything else pretty much snaps together. If you’ve forgotten which end is up on some of the pieces, the ports and connectors should make it obvious.
Now, if you’ve done everything right, you can replace the SIM card and the battery and you should have a working phone with an unbroken screen. I know I do! Total cost of repairs: $4.50 for the Torx screwdriver.
Allow me to reiterate once more, however: Unless you’re prepared to spend $200 on a new phone, don’t do this.